Monday, July 27, 2015

Cooking with Kids: Banana Peanut Butter Cupcakes

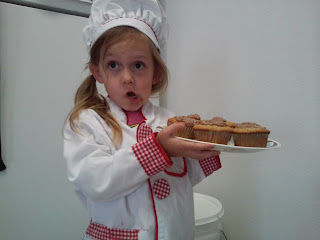
My kids LOVE to help me bake and cook. My 4 year old kept begging for me to let her make up her own recipe. So with some help, this is what she came up with. They were pretty darn good! The frosting we originally had was a chocolate custard mousse, which was AMAZING, but I found the flavors didn't really compliment each other well in the cupcake. So instead of providing that recipe here, I am providing a chocolate icing recipe that fits these cupcakes perfectly.

Banana Peanut Butter Cupcakes

-1/2 C butter, softened
-3/4 C sugar
-1/4 tsp salt
-1 tsp vanilla
-1/2 C Peanut Butter
-2 eggs
-2 tbsp buttermilk
-1 1/2 C flour
-1 1/2 tsp baking powder
-1 C mashed bananas


-cream together butter, sugar, peanut butter, salt, and vanilla until light and fluffy
-add eggs, one at a time, fully incorporating each egg
-sift together the flour and baking powder
-starting with the flour mixture, add a small portion of it to the cake mixture and gently mix in, stirring only until just incorporated
-add the buttermilk and mix again
-add more flour, mix and then a portion of the bananas, mix
-keep adding flour and bananas alternatively until everything in mixed in.
-try not to over mix or your cupcakes will be tough and chewing instead of light and fluffy. 
-spoon batter 3/4 full into lined muffin tins

Bake at 350 for 15-20 minutes 
(or until an inserted toothpick comes out clean)

Chocolate Icing

-1 C milk chocolate chips
-1/2 C cream
-2 tbsp butter
-1/2 tsp vanilla
-about 2 C icing sugar

-in a microwave safe dish, melt the chocolate chips and the cream together on high at 30 sec intervals, stirring each time until you have a smooth ganache
-in a mixing bowl add butter, chocolate mixture, vanilla, and about a cup of the icing sugar. Mix until fully incorporated.
-add more icing sugar until desired icing consistency is reached.
(keep in mind that the chocolate will harden quite a bit once it cools, so your icing doesn't have to be super thick)
-pipe or spread onto your cupcakes and enjoy!


Saturday, July 25, 2015

Fresh Blackberry Pie

It's berry season, and what is better than a fresh blackberry pie in the heat of summer? It definitely makes up for all the scratches and slivers you get from picking the berries! 

Fresh Blackberry Pie

-1 baked pie shell 
-about 4 1/2 C of fresh berries
-1/2 C sugar
-2 tbsp corn starch

-place 1 C of the berries into a saucepan with the sugar
(I use the less ripe, and smaller berries for this)
-heat over medium heat, smashing the berries as you stir.
-For best results, once the mixture is hot and the juices are leaching out of the berries, strain the mixture through a mesh sieve to remove most of the seeds. I usually use a spoon and press the mixture until there are only seeds remaining in the sieve. This can take quite a bit of time, but it's well worth it!
-Whisk in the corn starch before returning to the heat.
-Simmer over medium heat until the juice becomes a thick sauce. Add more sugar if the sauce is too tart (this really depends on the sweetness of the berries)You can also add a bit of water if the sauce turns out too thick. You want a nice pudding consistency, not too runny and not too thick that you can't mix in the berries.
-Remove from heat and let cool to room temperature.
-Gently fold in the berries and spoon into the pie shell.
-Refrigerate until ready to serve. 


Out of Season Variation: 
This is perfect when you pick so many berries that you don't know what to do with. It also works great with frozen berries that you buy at the store if you aren't lucky enough to live in an area with blackberries ;) 

-1 baked pie shell
-4 C frozen berries
-3/4 C berry juice
-1/2 Sugar
-2 Tbsp corn starch

-thaw berries in a strainer over a bowl.
-use the juice that was strained and add enough water to get 3/4 C of liquid. Mix it with the sugar and cornstarch in a saucepan.
-cook over medium low heat until sauce is thick.
-Cool and gently fold in berries. 


Friday, July 24, 2015

My Nanaimo Bar Obsession

So I've been on a Nanaimo Bar kick the last little while. I've made nanaimo bars (recipe HERE), nanaimo bar cupcakes, nanaimo bar icecream, and I have plans to make Nanaimo Bar cheesecake when I'm allowed to bake again. (My husband and I have a deal that I only make treats ONCE a week, and I've already gone way past my quota this last week...)

Anyway, the problem with having a small obsession with this divine Canadian confection is that I'm running low on the most important ingredient: Bird's Custard Powder. If I lived in Canada that wouldn't be a problem, but I don't, so it is. I could make my confections using vanilla pudding instead (and I've tried this before) but it just isn't as good.

The solution to my dilemma was quite simple. Why not make custard?! I found the original custard recipe HERE, but tweaked it a bit to fit my needs. Sure, using custard powder is the easiest option, but since I don't exactly have that option, I decided to go with making custard from scratch. Because I LOVE making things from scratch, I didn't mind the extra time and effort this added to my nanaimo bar baking experience. And guess what? It turned out AMAZING! Smooth and silky, with just the right custard flavor. So if you can't get your hands on custard powder, don't use vanilla pudding, try this instead! Stay tuned for recipes featuring nanaimo bar cupcakes and icecream! (when I get another free moment to write them down!)

Nanaimo Bar Filling

-1/2 C milk
-1/2 C cream
-2 tsp vanilla
-4 egg yolks
-2 tsp corn starch
 
-1/4 C butter
-2 to 4 C icing sugar

-in a heatproof bowl whisk together the egg yolks, corn starch and vanilla
-in a saucepan, combine the milk and cream and heat over medium, stirring constantly until the milk/cream mixture is hot, almost boiling, but do not allow boil.
-temper the eggs by pouring a little of the hot milk mixture into the egg mixture while whisking constantly. After the first little bit has been whisked in, slowly add the rest of the milk mixture in a slow stream while whisking constantly.
-return the mixture to the saucepan and cook, stirring constantly over low heat until the mixture thickens and coats the back of a spoon. (If you cook the mixture too long, or allow it to boil it could curdle, and you don't want that!)
-allow to cool to room temperature
-in a mixing bowl cream together the custard, butter and icing sugar. (start with about 2 c of the icing sugar and add more if needed to make it thick enough to spread melted chocolate over. 


Tuesday, July 14, 2015

Belgian Buttermilk Waffles

These waffles are light, fluffy and flavorful. A waffle mix can't even compare with these amazing waffles! I took a simple belgian waffle recipe from an old cook book I had laying around and modified it into the best belgian waffles I've ever had! This Butter Pecan Sauce also goes well on top of these waffles.

Belgian Buttermilk Waffles

-1 1/2 C flour
-2 tsp baking powder
-1/2 tsp baking soda
-pinch of salt (about 1/8 tsp)
-3 Tbsp sugar
-1 1/2 C buttermilk
-1/2 C melted butter
-1 tsp vanilla
-3 eggs, separated

-Beat egg whites until stiff peaks form
-Meanwhile, mix all the other ingredients together until smooth. Fold in the egg whites.
-Follow the instructions on your waffle iron for cooking the waffles.


Wednesday, July 8, 2015

Chocolate Ice Cream

This ice cream is delicious, especially on an extremely hot day! I don't think I will ever buy ice cream again.

Chocolate Ice Cream

-2 C whole milk
-5 egg yolks
-3/4 C sugar
-2 tsp vanilla
-1 C powdered milk
-2 C cream
-1 C melted milk chocolate

-stirring constantly in a saucepan over medium heat, warm the milk until it is hot, but not boiling.
-in a bowl whisk the egg yolks, sugar and vanilla together.
-temper the eggs by SLOWLY pouring the hot milk into the egg mixture in a slow stream while constantly whisking the eggs. When all the milk has been added and thoroughly mixed, return the mixture to the saucepan and continue to simmer  and stir constantly for 5 to 10 minutes over low heat.
-let the mixture cool.
-in a different bowl, mix the powdered milk in with 1 1/2 cups of the cream and strain out the lumps.
-in a microwave safe container, melt and then mix the chocolate and 1/2 C cream together into a smooth ganache.
-add everything together and refrigerate for a few hours or overnight.
-Mix icecream according to your ice cream makers instructions, or
-place in a kitchen aid and beat on high for a few minutes, then place the bowl in the freezer.
-take the bowl out of the freezer every 20-30 minutes and beat on high until smooth.
-do this until a soft serve ice cream is formed.
-Mix in your favorite mix-ins and pour into a freezer safe container and freeze until hardened. Or eat immediately!


Monday, July 6, 2015

Butter Pecan Sauce

This sauce is absolutely divine! I found this recipe around 8 years ago while randomly flipping through my Mom's collection of recipes, but hadn't actually tried it until just last year. Since then, it has been a favorite for special occasions. It goes perfect on these pancakes! It can also be used as an ice cream topper.


Butter Pecan Sauce

-1/2 C Butter            -1 C Whipping Cream
-3/4 C Sugar             -1 C Chopped Pecans
-1/4 C Corn Syrup     -1/2 tsp Vanilla

-Cook butter in a saucepan, 4-6 minutes or until golden brown.
-Stir in sugar and syrup.
-Cook and stir until sugar is dissolved.
-Remove from heat and gradually stir in cream.
-Return to heat, bring to a boil, then reduce heat to medium.
-Cook until the mixture thickens.
-Remove and stir in nuts and vanilla.
-Serve warm


             Variation: use walnuts in place of pecans, and maple extract in place of vanilla for a maple-walnut sauce that is also extremely yummy! 

Tips for Ditching the Box

Sometimes making EVERYTHING from scratch can be a challenge, especially when life gets busy and realize that you probably should have eaten dinner an hour ago. Here are a few tips I've discovered really help make life easier when you don't cook from a box.

-Buy (or grow if you have a garden!) fresh vegetables, cut them up, blanch them and then freeze them. This takes a lot of initial prep time, but once it's done it's much easier to grab what you want from the freezer right when you need it. It cuts down on prep time when preparing certain meals, or when you decide you'd like a side of vegetables.

-Make extra food and instead of eating leftovers for days on end, freeze it! My kids will not eat leftovers, but when I freeze the leftovers I can pull them out on days that I don't feel like cooking or don't have time to. All the sudden, it's not a leftover anymore, it's a new meal that you haven't eaten in awhile.

-Collect recipes and make a list according to categories and put it up on your fridge.
An example could be:
      -meals that don't require turning on the oven (for hot days)
      -meals in under 20 minutes
      -meals for when I'm super motivated and want to make something spectacular and don't want to spend money going out to eat

...stuff like that...

-Making freezer meals ahead of time is also always a great idea. When I feel like treats, I like to make cookie dough, form it into individual balls and freeze it for whenever I feel like eating a fresh cookie (but to be perfectly honest, the dough rarely makes it to the oven because my husband and I usually eat the dough before that happens!)

In conclusion, making everything from scratch takes a lot of planning and preparation, but just like everything, once you get used to it, it gets easier and more enjoyable. You could try a gradual decent by starting with one meal a week and going from there. Either way, I believe that food is to be enjoyed as well as being an essential part of life. Happy cooking!

Sweet n Sour Meatballs

This dish is packed with flavor! It has a bed of rice, seasoned vegetables piled on and is topped with sweet n sour meatballs and sauce. I love this sweet and sour sauce because it is super easy to make and can be made from ingredients that I always have on hand. I put a slight spin on my Mom's original meatball recipe to really amp up the flavor. I used mostly frozen vegetables that I buy fresh, and then blanch (excluding the corn and peas). This time when I made this I actually wrote down what I did, so I could share the recipe!

Sweet n Sour Meatballs

Meatballs                                                     
   -1 lb ground beef                              
   -1/3 to1/2 C oats                                         
   -1/2 minced onion                            
   -1 tsp minced garlic                          
   -1/4 tsp pepper                                    
   -1/2 tsp salt                                      
   -1/8 to 1/4 tsp ground ginger                        
   -1/4 to1/2 tsp ground cumin                      
   -1 tsp sesame seed oil                      
   -2-3 Tbsp soy sauce 

   -1 egg 

Seasoned Vegetables  
   -1 C corn                   
   -1 C peas
   -1 C chopped broccoli
   -1 C chopped carrots
   -1 bell pepper, diced
   -1/2 onion, diced
   -any other vegetables you'd like
   -salt and pepper to taste
   -1/8 tsp ground cumin
   -1/8 tsp ground ginger
   -2 Tbsp soy sauce
   -1 tsp sesame seed oil

Sweet n Sour Sauce                           
   -1 C brown sugar
   -1/4 C ketchup
   -1/3 C vinegar
   -2 Tbsp soy sauce

Meatballs
Dump all the ingredients into a bowl and mix thoroughly. Form into balls and place in a frying pan over medium to medium-low heat. Place a lid on top for more thorough cooking. Turn each ball every few minutes until all side are browned and the internal temperature of the meatball reads at least 160 degrees F.

Vegetables
Mix the seasonings (ginger, cumin, soy sauce, sesame seed oil and salt and pepper) in a small bowl and drizzle over the vegetables, stirring until all the vegetables are coated. Cook the vegetables in a large frying pan with a little bit of oil or butter over medium heat until desired tenderness is reached. 

Sweet and Sour Sauce
Place all the ingredients into a sauce pan. Bring to a boil over medium-high heat and then reduce the heat to medium-low and continue to simmer for about 5 minutes.

When sauce is finished, mix in the meatballs, coating them completely with the sauce.

*For a thicker sauce*: Mix 2 Tbsp of cornstarch with 1 C of cold water. Whisk into the sauce and cook over medium heat until the sauce darkens in color and thickens. (roughly 5-10 minutes)

Plate cooked rice, then vegetables, and finally top with the meatballs and sauce. Enjoy!